
KoolAid Dying Wool
KoolAid dying wool for wool diaper covers is easy and fun - almost addictive if my dyed in the wool stash demonstrates anything. It is even a project that older kids can help with. Of course, KoolAid dying wool is also great for craft projects, other baby items, felted purses or other wool projects.

You'll find other KoolAid dying wool instructions out there and linked below. I am not an expert, but this is my easy method for KoolAid dying wool.
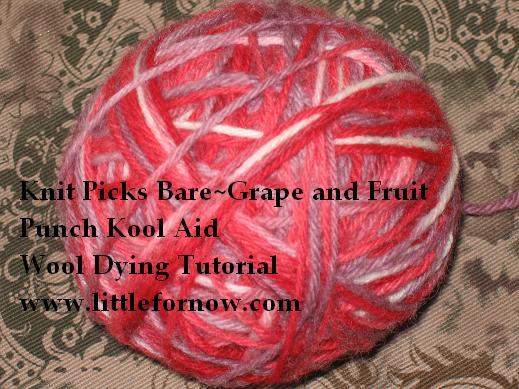
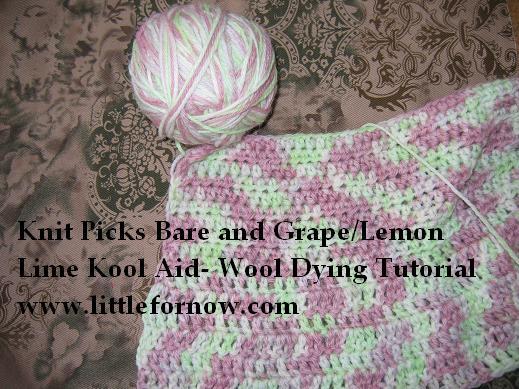
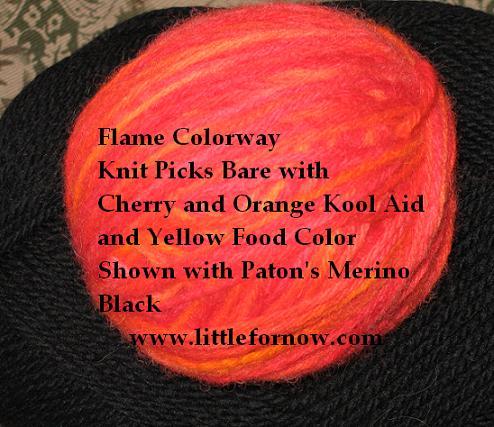
It is easiest to do with a yarn that is prepared for KoolAid dying. One option is bare yarn from Knit Picks. Most of the examples here are KoolAid dyed wool yarn from Knit Picks. Their yarn is very soft, a great price and comes in long loops tied and ready to dye.
You can also use the instructions for KoolAid dying wool on already made wool diaper covers or wool soakers. You will need to be extra careful with these items so they don't felt and shrink. Wool felts with agitation and rapid temperature changes. If you are gentle with it and don't change the temperature too quickly you should be fine.

KoolAid Dying Wool Ingredients:
Several packets of unsweetened Kool Aid or similar powdered drink mix
White vinegar
Wool yarn or cloth
Dish soap (Dawn works great) or Synthrapol (a special dying soap used to be sure the fiber is free of any residue that can interfere with dying)
A glass dish to microwave the wool in or a pan for the stove top method
Rubber gloves (trust me on this one, you don't want to walk around looking like me)
Soak the wool yarn / wool soaker / wool fabric in warm water with a small amount of dish soap or Synthrapol for several minutes. Rinse gently but don't worry about the soap too much. If the wool has a lot of lanolin in it you may need to soak longer.
Soak the wool in vinegar and water for 10-30 minutes. Gently press out the water. Do not wring or agitate.
Prepare your Koolaid by mixing each color into warm water in a separate jar or small container with a spout. If you are using the stovetop method or want the wool to be all one color you can mix several packets into a cup or two of water. In a pan you will need to cover the wool completely to get an even color. In the microwave method you can paint a small amount of very concentrated KoolAid onto the yarn in patches. In that case you will want to use 1 packet in about 1/4-1/2 cup warm water. Stir well to be sure there are no lumps that can cause streaks on your wool.
Koolaid Dying Wool Microwave Method:
Place your wool in a microwave safe glass dish. If you are not too picky you can do all the colors at once. If you are a neatnik you can do one color at a time, but I have no patience for this method.
Carefully paint the color onto the wool in patches. I use a spoon but you can also use a paint brush, turky baster or a small pitcher. You can just pour the color over the wool if you intend to make it all one color but make sure you have enough to saturate the whole item. Pur quickly so you don't end up with dark spots.
I usually use 2 colors and leave part natural or use 3 color per skein. It takes about 3 packets of Koolaid for one 4 ounce skein. Lemonade and very light or dark colors can require more to get the vibrant color you are looking for. I paint one end with one color, paint the middle a second and use a third color on the last section if I am using 3 colors. For 2 colors and natural I leave the middle natural so the colors bleed towards the middle. If you are using adjoining colors, be sure that they blend well. Yellow bleeding into blue will give you green. Good if you want green, not so good if you don't. Orange bleeding into red won't even be noticable. Blue bleeding into orange will give you brown, kind of.
You may need to squish the color a little to get it soaked in where you want it. If you are not careful you can end up with white spots so be sure the color saturates properly.
Microwave 2 minutes. Cool 2 minutes. Microwave 2 minutes. Cool 2 minutes. Microwave one more time for 2 minutes. Allow to cool and then rinse in same temperature water until the water runs clear. Don't agitate the wool, just rinse thoroughly.
Stove Top Koolaid Dying Wool:
Add just enough water to your pan to cover the wool you intend to dye. Stir in the Kool Aid until there are no lumps left. You want to be very sure it is blended well so there are no streaks on your project.
Add your soaked and vinegared wool to the pan and bring to a slow simmer. Gently simmer for a few minutes until you get the color you want. The water will become clear or milky when the color has all been absorbed. Cool, then rinse very gently until the water runs clear.
Allow your finished piece to air dry.
It is possible for urine to make some dye bleed onto your cloth diapers after KoolAid dying wool. If this happens it will almost always wash out. If not, try sunning your diapers until the stain disappears.
I have also used food color with some success.
You'll be amazed at the vast color range available with KoolAid Dying Wool. Here is a link to a really nice color chart of KoolAid Dying Wool colors on both natural cream and brown wool.